Tuesday, June 29, 2010

Asterisk, the VoIP Server on DD-WRT

I'm a big fan of Asterisk on router -- imho, it's the perfect platform for anyone want to try Asterisk at home -- 24x7, fanless and even the cheapest router can handle at least 2-3 concurrent conversation. Before this WZR-HP-G300NH, I had Asterisk running on a WRT54G-TM for over a year with lots of fun.

Installing Asterisk on the router is easier now as current OpenWrt trunk build(the one we use) includes prebuilt Asterisk binaries. As always, since OpenWrt is designed to work with / not /opt, some adjustment is required to get Asterisk working properly.

  1. Install Asterisk 1.6
    Believe it or not, DD-WRT MEGA also has Asterisk included -- it's an old ver1.4 and some important files are missing -- I have no idea why DD-WRT decided to do so, too much flash ROM? Anyway, to install Asterisk 1.6 on our opkg enabled router, run
    opkg install asterisk16

    You may also want to install some additional modules like:
    opkg install asterisk16-res-agi
    opkg install asterisk16-res-musiconhold

    To view a full list of Asterisk packages(lots of them!), run
    opkg list | grep asterisk16

  2. The configuration file: asterisk.conf
    With our installation, the asterisk.conf is in /opt/etc/asterisk/asterisk.conf. Change it to the contents below:

    [directories] ; remove the (!) to enable this
    astetcdir => /opt/etc/asterisk
    astmoddir => /opt/usr/lib/asterisk/modules
    astvarlibdir => /opt/usr/lib/asterisk
    astdbdir => /opt/usr/lib/asterisk
    astkeydir => /opt/usr/lib/asterisk
    astdatadir => /opt/usr/lib/asterisk
    astagidir => /opt/usr/lib/asterisk/agi-bin
    astspooldir => /var/spool/asterisk
    astrundir => /var/run/asterisk
    astlogdir => /var/log/asterisk
  3. [compat]
    pbx_realtime=1.6
    res_agi=1.6
    app_set=1.6


    As you can see, by modifying this file, we tell Asterisk to look for files at /opt/etc/asterisk and /opt/usr/lib/asterisk instead of default locations, which fits our installation.

    Now try to launch asterisk by running:
    asterisk -vvvvvc
    Exit by pressing ctrl+c

  4. Asterisk configuration
    By default, asterisk loads lots of modules, you can change the settings to fit your needs and reduce memory usage.

    Below is a sample of /opt/etc/asterisk/modules.conf with reduced modules:

    [modules]
    autoload=no                ; only load explicitly declared modules
    load => app_dial.so
    load => app_echo.so
    load => app_macro.so
    load => app_playback.so
    load => chan_sip.so
    load => codec_ulaw.so
    load => pbx_config.so
    load => format_pcm.so
    load => format_wav.so
    load => func_callerid.so
    load => func_strings.so
    load => res_musiconhold.so
    load => res_agi.so

    For SIP users, other important files including /opt/etc/asterisk/extensions.conf and /opt/etc/asterisk/sip.conf. These are not covered here, please refer to website about Asterisk like asteriskguru and voip-info.org. Also, here is a must-read  ebook: Asterisk: The Future of Telephony Second Edition(download the PDF book)

  5. Run it as service
    Create file /opt/etc/init.d/asterisk with below(delete previous contents if its not empty)

    source /mnt/root/.profile
    mkdir -p /var/run/asterisk
    mkdir -p /var/spool/asterisk
    mkdir -p /var/log/asterisk/cdr-csv
    /opt/usr/sbin/asterisk -C /opt/etc/asterisk/asterisk.conf

    And run
    chmod a+x /opt/etc/init.d/asterisk
    ln -s /opt/etc/init.d/asterisk /opt/etc/init.d/S95asterisk

That's all. Enjoy Asterisk and happy VoIP!
Read More...

Lighttpd and php on DD-WRT

Busybox httpd is good for simple static pages, now here is a tutorial for installing lighttpd and php with fastcgi support in the router. Here I choose lighttpd over Apache for its light cpu usage and small memory footprint.

Since all our software are based in /opt folder, some modification must be done to get everything working:

  1. Install php5 and lighttpd
    To install php5 with fastcgi support, run
    opkg install libsqlite3
    opkg install php5-fastcgi
    opkg install php5-modgd
     
    Along with php5, the popular libgd module is also installed. Copy php.ini to its default location.
    cp /opt/etc/php.ini /etc/php.ini

    After that, test php installation by running:
    php-cgi -v

    You should see the version info and no warning/error message.

    Install lighttpd and some modules
    opkg install lighttpd
    opkg install lighttpd-mod-fastcgi
    opkg install lighttpd-mod-simple-vhost

  2. Modify php.ini
    Edit /etc/php.ini
    Find doc_root = "/www"(or whatever) and change it to doc_root = "/opt/www"
    Find extension_dir = "/usr/lib/php" and change it to extension_dir = "/opt/usr/lib/php"
    Find ;extension=gd.so and remove the leading semicolon, i.e., change it to extension=gd.so
    Find ;date.timezone= , remove the leading semicolon and change it to
    date.timezone = "America/New_York"
    Replace the red part with yours, a full list is available here.

  3. Modify lighttpd.conf
    With our installation, the configuration file for lighttpd is located at /opt/etc/lighttpd/lighttpd.conf. Edit this file:

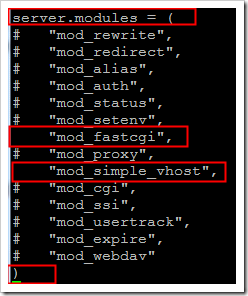
    First, enable mod_fastcgi and mod_simple_vhost:
    lighttpd-module-enable

    Then
    find server.document-root  and change its value to "/opt/www"

    find #server.port = 81 and change it to server.port = 81
    This will set lighttpd server to listen port 81. If you want to use port 80, make sure to move the DD-WRT's web admin to another port, details here, step 1.

    add following at the end of the file:

    fastcgi.server = ( ".php" => ((
                         "bin-path" => "/opt/usr/bin/php-cgi",
                         "socket" => "/tmp/php.socket"
                     )))

  4. Lighttpd startup script
    Create or edit file /opt/etc/init.d/lighttpd with below. Remove any previous contents if its not empty.

    #!/bin/sh

    source /mnt/root/.profile


    BIN=lighttpd

    LOG_D=/var/log/$BIN
    RUN_D=/var/run
    PID_F=$RUN_D/$BIN.pid

    COND=$1
    [ $# -eq 0 ] && COND="start"

    case $COND in
    stop)
      killall lighttpd
      killall php-cgi
      ;;
    start)
      mkdir -p $LOG_D
      mkdir -p $RUN_D
      $BIN -f /opt/etc/lighttpd/lighttpd.conf -m /opt/usr/lib/lighttpd
      ;;
    *)
      exit 1
    esac


    Set it as a service
    chmod a+x /opt/etc/init.d/lighttpd
    ln -s /opt/etc/init.d/lighttpd  /opt/etc/init.d/S80lighttpd

  5. Test lighttpd server
    First create the home folder
    mkdir /opt/www

    Then the test file /opt/www/phpinfo.php with contents below:

    <?php
    phpinfo();
    ?>

    After that, launch lighttpd
    /opt/etc/init.d/lighttpd
    #to stop the lighttpd server, run /opt/etc/init.d/lighttpd stop

    Open browser and navigate to http://router_ip:81/phpinfo.php to check the output.

Read More...

Monday, June 28, 2010

Simple busybox http server on DD-WRT

By default DD-WRT runs its own http server(/usr/sbin/httpd), providing web management interface to configure the router. The server is highly integrated and hard to reuse for our own contents. If you just want to host some web pages without CGI support, the httpd server in busybox is a good alternative.

  1. (Optional)Move DD-WRT's web admin to another port
    The best way to do so is changing a nvram value as described here.
    So login the router and run
    nvram set http_lanport=88
    nvram commit


    Then after rebooting, the new port will be 88 and you can access the web admin at http://router_ip:88/. Everything should work just as before including firmware upgrade.

  2. Configure busybox httpd
    The OpenWrt's busybox is installed if you followed the previous post. This busybox provides more features than the DD-WRT one, including a small web server. To launch it, run
  3. /opt/usr/sbin/httpd -p 80 -c /opt/etc/httpd.conf -h /opt/www

    the server(/opt/usr/sbin/httpd) will listen port 80(-p 80) with configuration file /opt/etc/httpd.conf(-c /opt/etc/httpd.conf) and use /opt/www as home folder(-h /opt/www).

    Everything looks good, except, both our http server and dd-wrt's are called httpd. This will be a problem as DD-WRT will kill and restart the httpd service when applying some settings. If that ever happens, our httpd service will be terminated unexpectedly. So let's change the service name.

    Here is (another) dirty hack but works for me. Log in PuTTY and run:

    cp /opt/bin/busybox /opt/bin/busybox.orig
    cp /opt/bin/busybox /tmp/busybox
    sed -i 's/httpd$/httpe/g' /tmp/busybox
    cp /tmp/busybox /opt/bin/busybox
    ln -s /opt/bin/busybox /opt/usr/sbin/httpe

    So now we have changed the name of busybox's http server from httpd to httpe. If it's messed up, restore the old busybox:
    /bin/cp /opt/bin/busybox.orig /opt/bin/busybox

  4. Run it as service
    Create file /opt/etc/init.d/httpd

    source /mnt/root/.profile
    /opt/usr/sbin/httpe -p 80 -c /opt/etc/httpd.conf -h /opt/www

    And run
    chmod a+x /opt/etc/init.d/httpd
    ln -sf /opt/etc/init.d/httpd /opt/etc/init.d/S20httpd

Read More...

Sunday, June 27, 2010

Upgrade DD-WRT and Keep Installed Applications

The DD-WRT support for these new 11N Gigabit routers are still in early stage with new builds rolling out every one to two weeks. The old good "if its not broken then don't fix it" rule might not apply here and I suggest to stay with latest release if you have the time(and guts).

Upgrading a DD-WRT firmware with loaded software is pretty easy, considering the extra work we've done. Take the trouble not to mess with important system folders like /lib /usr and /bin and now its the reward time.

  1. Stop installed software
    Log in the router, rename the /mnt/optware.enable
    mv /mnt/optware.enable /mnt/optware.disable

    Then reboot the router. After rebooting, the router is back to standard DD-WRT with no extra load and ready for flashing.

  2. Upgrade firmware
    Get the new DD-WRT build, the name should be wzr-hp-g300nh-dd-wrt-webupgrade-MULTI.bin. Some suggests a hard reset before and after upgrading but I usually just select "Reset to Default Settings" during flash.
    firmware-reset-to-default
    After flashing, all settings will be erased and then you have to start over again.

  3. Set the router
    Set the router as usual. Here is a quick list for additional setup, all are covered in other posts, I just put these together for easy reference.

    Enable SSH and USB Support. Details here, Step 2.
    Customized startup script. Details here, Step 10.
    Disable DD-WRT's NTP Client if you're about to use local time. Details here, Step 1.
    Disable built-in FTP server(should be off by default). Details here, Step 1.

    Then some nvram variables:

    #use local time. details here, step 3. Change it accordingly
    nvram set time_zone=PST8PDT,M3.2.0,M11.1.0
    #
    move dd-wrt's web admin to another port. Details here, step 1
    nvram set http_lanport=88
    nvram commit

    After that, reboot the router.

  4. Update writable /etc and re-enable installed apps
    After reboot, login the router and run:

    cp -a /etc/* /mnt/etc/
    mv /mnt/optware.disable  /mnt/optware.enable

    The first line is very important. It's for synchronizing our the customized /etc folder with the new firmware's /etc folder. Forget to do so will break the web management interface!

    Somewhat modified, the files in /etc folder are only added(like /etc/TZ) or dynamically updated(the adduser script), so it's safe to overwrite the /etc folder with new contents and all our work is kept intact. After that, reboot the router, and you should have a new DD-WRT with all previously installed software running.

  5. Fix the broken web interface
    You'll get this error ONLY if you forget to update the /etc folder, see Step 4 above. If this ever happens:
    SSH or telnet login the router, run

    mv /mnt/optware.enable /mnt/optware.disable
    reboot

    the web interface should be back after rebooting, then follow Step 4.

    If the web interface is messed and you can't login from PuTTY, unplug the USB disk and power cycle the router. Then manually mount the USB disk(details here, step 2 and 6) and update /etc folder following Step 4.

Read More...

Workaround for Stuck Beacon Problem

Stuck beacon is a notorious problem on madwifi (the wireless driver DD-WRT used for Atheros routers).  If you never experienced any wireless interruptions with DD-WRT then just ignore this article. However, if you're annoyed by this stuck beacon problem with constantly dropping wireless connection, then I hope this can be of help.

I personally prefer the open source ath9k driver which doesn't suffer from this, but some important feature like WDS is missing from ath9k. So to each its own, DD-WRT has the perfect reason to stick with madwifi and I don't expect the switch to ath9k anytime soon. And, seems that the problem only happens under certain circumstance. In my case, the connection drops with an Atheros wireless N card -- same card works great with stock firmware -- but works fine with another Intel WiFI 1000 11N card. So if a stable wireless connection is very important, the best solution might be flashing back to stock firmware or just try another card.

Below is a quick hack, not a completely fix but would make life a little easier. The idea is to watch the output of dmesg and when the "stuck beacon" error messages flood, reset the wireless interface to bring it back to life.

  1. The watchdog script
    When wireless connection is dropeed, a typical out from dmesg would like this

    ath_bstuck_tasklet : Entering
    Resetting; Code: 01
    ath_bstuck_tasklet : Entering
    Resetting; Code: 01
    ath_bstuck_tasklet : Entering
    Resetting; Code: 01
    ath_bstuck_tasklet : Entering
    Resetting; Code: 01
    ath_bstuck_tasklet : Entering
    Resetting; Code: 01
    ath_bstuck_tasklet : Entering
    Resetting; Code: 01

    the same error message will keep repeating and flood the kernel log. So we can use this as a trigger and reset wireless interface when the error occurs.

    Below is the /opt/usr/local/bin/wifi-watchdog.sh script

    #!/bin/sh

    dmesg | tail -n 5 | grep -q ath_bstuck_tasklet || exit

    echo fixing...
    #a log file
    echo `date` >> /tmp/wifi-wathdog.log

    ifconfig ath0 down
    #for VAP, bring additional interface(s) down
    #ifconfig ath0.1 down
    sleep 2
    ifconfig ath0 up
    #bring it back
    #ifconfig ath0.1 up

    Set permissions
    chmod a+x /opt/usr/local/bin/wifi-watchdog.sh

  2. Set cron job
    With the watchdog script ready, we can use cron to set it run every one minute.
    Add a new job:

    * * * * * /opt/usr/local/bin/wifi-watchdog.sh

    and it's done. Again, its not a completely fix just save the trouble of resetting the router each time.

Read More...

Wireless Scheduler with Cron Job

Cron is a time-based job scheduler in Linux systems which enables users to schedule jobs (commands or shell scripts) to run periodically at certain times or dates. In this example, we'll use cron to control the wireless signal, set it to turn on only at given time.

DD-WRT is shipped with cron support but again we'll use our own cron daemon as it's easier for future update and will save some flash wearing.

  1. Disable DD-WRT's Cron
    From the web interface, Administration->Management, find "Cron" and disable it, then click "Apply Settings"
    cron-disable

  2. Install cron(busybox) service
    The cron is provided by busybox and should've been installed. If not, run
    opkg install busybox

    and create the scheduling file folder:
    mkdir /etc/crontabs

    Set it to run on startup by creating /opt/etc/init.d/crond with following:

    source /mnt/root/.profile
    kill -9 $(pidof crond)
    /opt/usr/sbin/crond

    Then:
    chmod a+x /opt/etc/init.d/crond
    ln -s /opt/etc/init.d/crond /opt/etc/init.d/S80crond

  3. The script to switch wireless
    Now create a file /opt/usr/sbin/wireless-off.sh

    #!/bin/sh
    /sbin/ifconfig ath0 down

    another one: /opt/usr/sbin/wireless-on.sh

    #!/bin/sh
    /sbin/ifconfig ath0 up

    On VAP enabled routers, additional interfaces like ath0.1, ath0.2...etc. also need to be taken care of:
    /sbin/ifconfig ath0.1 down
    and
    /sbin/ifconfig ath0.1 up
    The full list of wireless interfaces can be found by running /sbin/ifconfig

    Don't forget the permission:
    chmod a+x /opt/usr/sbin/wireless-on.sh /opt/usr/sbin/wireless-off.sh

  4. Edit Cron Scheduler
    DD-WRT's wireless scheduling is available only for Broadcom routers(see picture below) but missing from Atheros builds.
    radio-sheduling-broadcom 
    However, its not hard to implement this on Atheros routers with the help of cron and the scripts above.
    For example, to turn on wireless only from 5pm to 11pm, run
    crontab -e
    which will bring you the cron job editor. Add two lines like that

    0 17 * * *   /opt/usr/sbin/wireless-on.sh
    0 23,0-16 * * *   /opt/usr/sbin/wireless-off.sh


    Save. The wireless-on script will runs only once at 5PM(17:00) but the wireless-off script runs every hour(23:00, 0:00 ... 16:00) to ensure the wireless can still be turned off in case the router is rebooted halfway.

    Now how about turning off wireless only on weekdays?

    0 17 * * *   /opt/usr/sbin/wireless-on.sh
    0 23,0-16 * * 1-4   /opt/usr/sbin/wireless-off.sh
    0 0-16 * * 5   /opt/usr/sbin/wireless-off.sh


    Refer here for the full instruction about cron.

Read More...

BitTorrent Client: Transmission on DD-WRT

If you've followed the previous guides to set the opkg system, then installing transmission on the USB enabled DD-WRT system is a no-brainer. Only one little thing needs to be taken care of...

  1. Install transmission
    To do so, Use PuTTY to log in and run the command below:
    opkg install transmission-web

    This will install libevent(required library) transmission-daemon(the actual program) and transmission-web(the web interface).

  2. Setup transmission
    Run
    transmission-daemon
    wait for 10 seconds then stop it:
    killall transmission-daemon

    This will create default configuration file for transmission, the file is located at /mnt/root/.config/transmission-daemon/settings.json
    Edit this file with following(delete all previous contents)

    {
    "blocklist-enabled": 1,
    "download-dir": "\/mnt\/share\/torrents",
    "download-limit": 100,
    "download-limit-enabled": 1,
    "encryption": 2,
    "max-peers-global": 35,
    "peer-port": 25000,
    "pex-enabled": 1,
    "port-forwarding-enabled": 1,
    "rpc-authentication-required": 0,
    "rpc-password": "",
    "rpc-port": 9091,
    "rpc-username": "",
    "rpc-whitelist": "192.168.1.*",
    "upload-limit": 200,
    "upload-limit-enabled": 1
    }


    Above is taken from DD-WRT wiki with some modification. Also create the download folder
    mkdir -m 777 /mnt/share/torrents

    So now all configure files for transmission are in /mnt/root/.config(or /tmp/root/.config, its the same). Downloaded files will be in /mnt/share/torrents

  3. Set transmission for web access
    This is usually not a problem, however, in our setup, the web pages is are in non-standard location. So we must let transmission aware of the change.

    To do so, a variable must be set for transmission. Run the command lines below:
    export TRANSMISSION_WEB_HOME='/opt/usr/share/transmission/web/'
    transmission-daemon

    Now access transmission web manage interface at http://ip_of_the_router:9091/
    If everything works out, move to next step.

  4. Run it as service
    To do so, add the following line to /mnt/root/.profile

    export TRANSMISSION_WEB_HOME='/opt/usr/share/transmission/web/'

    Then create the startup script /opt/etc/init.d/transmission(delete all previous contents if its not empty)

    source /mnt/root/.profile
    killall
    transmission-daemon
    sleep 2
    transmission-daemon -g /mnt/root/.config/transmission-daemon/


    Set it to run as service:
    chmod a+x /opt/etc/init.d/transmission
    ln -s /opt/etc/init.d/transmission /opt/etc/init.d/S60transmission

Read More...